This repository contains the framework using in our paper called: Neural NMPC through Signed Distance Field Encoding for Collision Avoidance, published in IJRR.
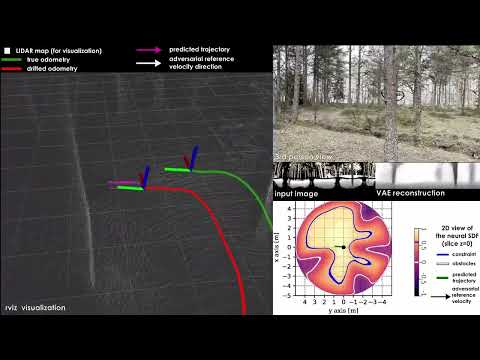
Watch our companion video here:
We recommend using a clean python virtual environment.
The package was developped and tested using python 3.10, but there shouldn't be a reason to stick to this version.
Create and activate a virtual environment with:
python3 -m venv <path_to_venv>
source <path_to_venv>/bin/activate
Install the package dependencies:
- Git LFS, used to store pre-trained neural network weight files (
.pt)sudo apt-get install git-lfs git lfs install - L4CasADi
- We are still to upgrade to the newer
>=2.0versions, so we use1.4.1 - It must be installed using the
--no-build-isolationflag:pip install l4casadi==1.4.1 --no-build-isolation
- We are still to upgrade to the newer
- acados
- Install following the documentation
- acados-template, the python interface of acados
- The package was tested with acados
0.3.1, we recommend using the same for now - For ARM hardware, see this subsection
- The package was tested with acados
- If you are working on an Nvidia Jetson board:
- Installing pytorch goes through a dedicated set of pip wheels
- Specifically, use the
torch==2.1version for the JetPack 5 (Orin NX) or the JetPack 6
Finally, clone the current repo to install the sdf_nmpc python package:
git clone https://github.com/ntnu-arl/sdf-nmpc
cd sdf-nmpc
git lfs pull
pip install .
If you use the ROS2 wrapper node:
- Clone the repo in the desired colcon workspace
- Install python dependencies:
pip install matplotlib>=3.7.0
- Simply install with colcon
Note: for usage convenience (editing config files, etc), it is recommended to install with
--symlink-install - (recommended) Install the SDF-NMPC RVIZ plugin that provides an RVIZ interface for the controller services
For visualization and supervision from the Operating PC, the package and ROS Node could be installed on the OPC to run visualization of the SDF, VAE etc without extra overhead on the robot and with minimal network bandwidth (since only the latent vector is shared over the network).
In this case, simply run the same procedure as above.
-
references:
-
install acados with python interface
- if checking out another release, don't forget to
git submodule update
- if checking out another release, don't forget to
-
build tera_renderer natively
- install cargo
sudo apt-get install cargo - clone tera_renderer from
git@github.com:acados/tera_renderer.git - run
cargo build --verbose --release - symlink executable in acados folder:
ln -s <tera_renderer_root>/target/release/t_renderer <acados_root>/bin/t_renderer
- install cargo
-
add the usual line to .bashrc
export ACADOS_BASE=<acados_root>
export LD_LIBRARY_PATH=$ACADOS_BASE/lib:$LD_LIBRARY_PATH
export ACADOS_SOURCE_DIR=$ACADOS_BASE  # used by some acados scripts
The repo folder is organized as follow:
- sdf_nmpc: Main module folder, including Neural Nets, Casadi+Acados based controller, utils, and functional "API" classes
- config: Yaml files for missions configurations and robot parameters
- data: Neural network weights, stored with git LFS
- scripts: "Playground" script folder, which shouldn't be used for deployment
For tests in Gazebo, you can find example simulation files here.
This is a summary description of the config and what the user should know to run the controller for a given system.
The config for each given system is described in a dedicated yaml file. This include physical parameters, sensor descriptions, mpc / neural parameters, as well as mission parameters and flags.
Most of the file should stay untouched.
The parameters are commented and have relevant names.
Here is a commented sample of a config file, omitting with ... the only the parts that shouln't be edited:
name: default  # defines name of generated code

## mission parameters
ref:
    yaw_mode: align  # allowed modes: ref, align, current, zero
    align_yaw_offset: 0  # yaw offset in align mode [rad]
    stop_and_turn:  # maximum yaw error above which the reference velocity is set to 0 to enable stop-and-turn behavior
        enable: False
        dang_min: 1  # angle threshold to trigger stop and turn [rad]
    yaw_align_dmin: 0.1  # minimum distance under which yaw alignment is disabled [m]
    vref: 3  # norm of reference velocity [m/s]
    wzref: 1  # norm of reference yawrate [rad/s]
    zref: 2  # desired hovering z for takeoff [m]

## mission flags
flags:
    simulation: True  # sim or hardware experiment
    enable_sdf: True  # enable collision prediction
    sdf_cost: False  # use sdf in cost
    sdf_constraint: True  # use sdf in constraints
    vfov_constraint: True  # enable vertical FoV constraint
    ...

## nn parameters
nn:  # neural net weights files
    ...

## mpc parameters
mpc:
    model: att  # allowed models: acc, att, att_tau, rates, wrench, props
    weights:  # mpc weights, could be tuned for performances
        ...
    N: 20  # nb of shooting nodes
    T: 1.5  # lenght of horizon [s]
    bound_margin: 0.15  # safety margin for collision constraint [m]
    ...

## robot
robot:
    mass: 1.46
    ...
    sensor_extrinsics:
        position: [0.180, 0, -0.025]
        orientation: [0, 0, 0]
    size:
        xy: 0.22
        z: 0.1125
    limits:
        roll: 0.7
        pitch: 0.7
        wz: 3
        gamma: 20  # maximum mass-normalized thrust

## sensor
sensor:
    hfov: 0.7592
    vfov: 0.4903
    aspect_ratio: 1.778  # 16/9
    dmax: 5
    shape_imgs: [1, 270, 480]
    is_depth: True
    is_spherical: False
    is_normalized: False
    mm_resolution: 1000
    dtype: float32
The config files are stored in the python node for non-ROS usage.
To compile the corresponding model and solver, run the build script:
python3 <sdf/nmpc/folder>/script/build solver.py <cfg_file_name> (e.g., python3 ./script/build_solver.py default).
In addition, the ROS2 node also exports config files for convenience. It contains the same fields as the above yaml. In addition, some ROS-specific parameters are added:
## ros-specific params
ros:
    control_interface: acc  # allowed interfaces: acc, TRPYr, TRrPrYr (not implemented), props (not implemented)
    timeout_ref: 0.5  # allowed time without new reference before timing out controller [s]
    timeout_img: 1  # allowed time without new image before timing out controller [s]
    ref:
        ref_mode: topic  # allowed modes: topic, joystick
        stop_and_go: False  # go to wp with 0 velocity instead of having a sliding window as reference
        wps: [
            [1, 0, 2, 1.5], [2, 0, 2, -1.5], [3, 0, 2, 1.5]
        ]  # list of waypoints in ref_mode == cfg [m, m, m, rad]
        wp_tol: 0.8  # distance from wp below which it is considered explored and removed from the queue [m]
        joystick_lp_alpha: 0.9  # low-pass parameter for joystick cmd smoothing
    frames:
        world: map  # world frame in ROS TF
        body: rmf  # body frame in ROS TF
        sensor: rmf/base_link/lidar  # sensor frame in ROS TF
A ROS2 executable is provided to compile the model:
ros2 run sdf_nmpc_ros build_solver.py --ros-args -p cfg:=<choosen_cfg_file>
- To start the node on the robot, run
ros2 launch sdf_nmpc_ros mpc.launch cfg:=<choosen_cfg_file>- If the robot doesn't have a GPU (or if the avoidance is unused), set the
vaeparam to false
- If the robot doesn't have a GPU (or if the avoidance is unused), set the
- For visualization on OPC, run
ros2 launch sdf_nmpc_ros opc.launch cfg:=<choosen_cfg_file>- This will run the
viznode, that process the latent space (streamed on a topic) to display visualization images for RVIZ - It also runs a RVIZ window with the nmpc_plugin and several relevant topics in display
- Finally it runs the
- If the OPC has no GPU, disable the
viznode
- This will run the
The interaction with the node is handled via ROS services:
goto: publish waypoints specified in config file to the ros topic, which are then followed by the mpchover: set the hovering reference at the current position (non-moving reference)takeoff: set the hovering reference at the current x,y and the config-specified zset_yaw_mode: set the yaw tracking mode to free (ignores the reference and maintains the current yaw as a moving reference)get_yaw_mode: get the above flag valueset_flag: set the collision constraint flag valueget_flag: get the above flag valuestop: resets the node in its starting state, disables contraints, and discards references
When using this work in your research, please cite the following publication:
@ARTICLE{jacquet2025neural,
    AUTHOR={Jacquet, Martin and Harms, Marvin and Alexis, Kostas},
    TITLE={Neural {NMPC} through Signed Distance Field Encoding for Collision Avoidance},
    JOURNAL={The International Journal of Robotics Research},
    YEAR={2025},
    DOI={10.1177/02783649251401223},
}
You can contact us for any question:
- Martin Jacquet (corresponding author and main developper)
- Marvin Harms
- Kostas Alexis